Quantcast
Channel: Acumatica Singapore
Viewing all 110 articles
Browse latest View live

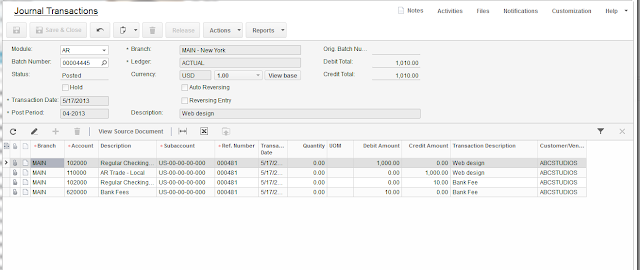
Activating Customer/Vendor field on Journal Transactions screen

$
0
0
Hi Guys,

What if our client wants to see Customer or Vendor ID on Journal Transactions screen grid?

There is an existing field, and it is populated from AR or AP modules with the ID.
But it is only available for view, we cannot edit it.
What if we need to track customer in our GL even if original transaction is from GL itself.

There are 2 ways to achieve it:

1. Add a field and make it selector from Business Accounts.

or

2. Activate the existing field so we can use for data entry.

Scenario 1. Adding a field.


It should be 30 characters long, as we will link it to the BAccount (Master table for Customer) BAccountCD field.


Last step is to choose a type of control, which is selector.


Then click Apply To Page. Lets publish the customization first to see added field to our grid.
Customization->Validate and Publish.

Now field is visible, but if I press magnifying glass message pops up:

It happens because we have not specified a Selector View in the field attributes. What I would like to do is to take existing selector from CRM module, Business Accounts screen.


Original Attributes from the Business Account field:


I will copy over PXDimensionSelector to my GL screen field.


I have to add reference to CRM module by using a prefix PX.Objects.CR in front of the DAC field:  PX.Objects.CR.BAccount.BAccountCD
There is one more hint here, we need to remove the second parameter from the selector call, finally will get this:


Apply to Page. Validate-Publish the customization. Result:


Scenario 2. Modifying Existing Customer/Vendor field.

Here we just need to change attributes for existing ReferenceID field and delete its Property.
Let's make attributes Visible and Enabled to be TRUE first.


Then we need to remove PXSegmentMaks property.


Apply to Page. Validate and Publish. Got the result:


All the best,
Sergey.

Some New Features in version 4.1 Cloud ERP

$
0
0
Hi Everyone,

Just wanted to share some of the UI and Functional enhancements to come in version 4.1
Some are still under consideration and test, let me know if you like/don't like.

1. Maintenance Screen for all Filters from the system. Including Grid Filters. Basically to organise filters created by users in numerous screens, so administrator or even user himself can find/delete/amend one quickly.


2. Grid Column Filters. User Interface for columns on the grid. This includes quick filters, much richer functionality.


3. Grid Column Sorting. Enhanced sorting options per column.


4. Payment Charges in Financial Modules. Its when we need to bank or other charges immediately when payment received or made. Cool feature, no need to do it via W/O or Cash manager any more.

And here is how it's GL would look like


5. Much nicer report layouts in HTML format.


Please post your comments until we have finalised the release.
And don't get me wrong there are many more enhancements, these are just a tip of the ice... cream ;)

All the best,

Sergey.

Upcoming Training at the Partner Summit

$
0
0
Hi Everyone,

We are now performing final tune up for our Development training sets, that will be later presented on the Summit.

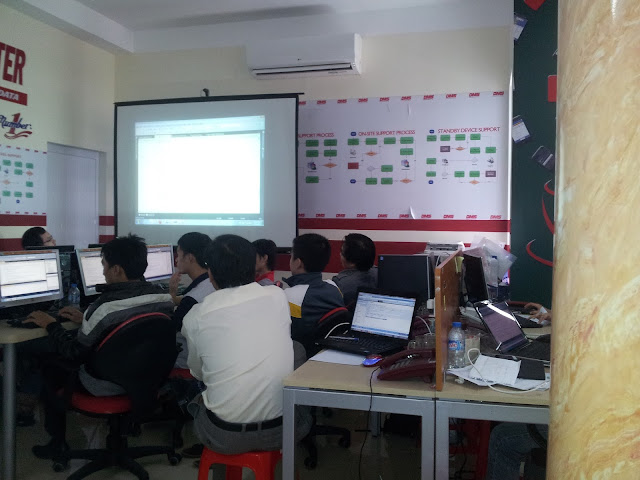
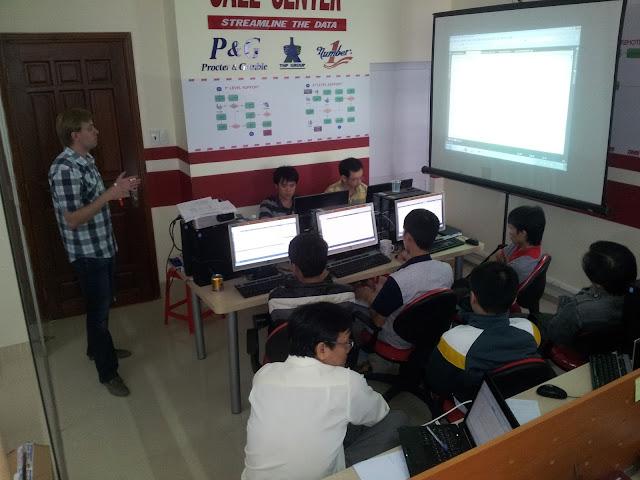
Here is the class we do right now for one of our partners in Vietnam. Team is extremely knowledgeable having experience with major conventional ERPs and cloud based Acumatica ERP.
Enjoying the Acumatica Framework and Event Model explained in details.


Outstanding job done by Ruslan Devyatko, our company Technical Evangelist.


All the best and see you on the Acumatica Summit 2013

Sergey.

Multi Company (Branch, Ledger) Consolidation

$
0
0

Hi Everyone,

Let’s explore Multi Company consolidation.
Well, even it is called Multi Company; in fact we can do it not only between different entities, but also branches or different ledgers of the same company as well.

What will happen, when consolidation is run?
1.       System will login into the source entity. Of course, it means we will somehow provide the password and user name for the consolidation process to do it. System will remember credentials, and then, when we call up the process - it will login into Source Company and…
2.       System will take data from the source company General Ledger, specifically from Account History table, or say, system will take Account/Subaccount balances or Trial Balance if you like and…
3.       System will place these balances INTO a GL batch on the Destination Company.

Well, that is all, now we just need to release this batch and will get destination company updated with the account/subaccount figures.

Q: So what actually consolidation is? A: Simple copying of the balances from place A to place B by means of creating a batch at the destination.

Q: When do we need consolidation? A: Anytime when you need to copy balances from company A to some other place B. Which could be reporting ledger within company A or another company or completely different entity.

Q: Where consolidation is run? A: It always run AT THE DESTINATION place. So, in other terms, it is a PULL process. Data PULLED by destination entity from the passive source entity.

Now, when basics are covered let’s perform a simple consolidation. For the sake of simplicity, I will create a destination Reporting Ledger within the SAME company and then copy data from ACTUAL accounting ledger into CONSOLIDATION reporting ledger.

Please note, we have to follow setup steps exactly in order to run consolidation successfully.

STEP 1. Mark Source Ledger as CONSOLIDATION SOURCE.

We need to login to a source company and on the Ledgers screen in GL, mark it as a Destination Source.


STEP 2. Create Destination Ledger.

I will create CONSOL reporting ledger in the same company. You can try it on another company or another entity. It will work CROSS entity as well. (That is the beauty of it :))


STEP 3. Configure Consolidation Template.

Using Consolidation screen we should configure consolidation process. Here we need to follow the steps exactly.
A.      Login to DESTINATION company
B.      Open Consolidation screen
C.      Enter Destination LEDGER
D.      Give a name to your Consolidation
E.       Provide Username to login into SOURCE company
F.       Provide Password to login to SOURCE company
G.     Press save button


You should see it like on the screen above.

A.      Now press button Synchronize All
B.      Click refresh button
C.      Click it ONE MORE TIME J
D.      Now press on the magnifying glass at the SOURCE LEDGER.
E.       Choose Source ledger. It will be the place where the data are coming from.
F.       Choose Period Start and Period To for the data to pull.


We should have something like above. Now can save it.


STEP 4. Configure Subaccount on the source.

Because of the fact that consolidation can be a complicated exercise, when we match multiple segments of the subaccount with each other, we have to configure the matching rule on the source company. In my example I will use simplest scenario with a single subaccount segment. Leaving to the reader to try more complex cases.


In my case I have to enter Consolidation Order = 1 and Number of Characters = 2.


STEP 5. Configure Account matching.

Technically we may have DIFFERENT chart of accounts on the source and destination companies. Therefore we should configure at the SOURCE, what will be the destination Account for each of the source accounts. In my simplest scenario, it will be one to one matching, so all we need to do, is to do provide SAME account as original one for each account we consolidate.


That is before, and this is AFTER


All I did is exported content into an excel file, then added Consolidation Account column, then imported back to the screen J. Saved.

PLEASE NOTE IF YOU DO NOT SEE CONSOL ACCOUNTS, YOU HAVE NOT COMPLETED STEP 3.

STEP 6. Performing data PULL.

Now final step, let’s go to Import Consolidation Data screen and pull the data from the source into our desired place.


Result would be

 
At the end we should get batches in GL with all the balances sitting there, all we need is to release it.

 
One important thing about consolidation is - if our fiscal period is closed we should allow posting to closed periods in GL Preferences screen.


All the best,

Sergey.


Choosing the right Edition. Number of CPU cores demystified.

$
0
0
Hi Everyone,

Sure you've seen this story.

Prospect: How to convince my boss (CIO etc.) that we are buying the right edition of Acumatica Cloud ERP?
Sales guy: Errr, mmmm, well... you should trust me...

Prospect: Ok, just explain why do we need 4 CPU not 2? We only have 3 companies, we can get 2 CPU, right? Why do you offer us 4 CPU license????
Sales guy: Errr, mmmm, well... where's the hell is the tech guy...?

So, here is a helping hand to our sales team.

What I did - took one of our big customers and analyzed the database transactions, users and payload.
It is a Departmental Edition with 2 CPUs for WEB server, 2CPU for SQL server, 4GB shared RAM. Sitting on a VERY FAST Hyper-V virtual machine (that is sharing SQL) and supplied with SSD hard drives. So we can say these CPU are ideal CPU for calculation of the capacity limits. :)

If you are not interested in technical part, just scroll till the big font area, then later just copy paste pictures to your PPTs when needed, especially the skyscrapers one.

The rest of the team can stay ;)

First of all, what WEB server CPU does at Acumatica  - it processes Business Logic.

If it does not ring the bell... CPU is processing what you have entered into the screen, then validating that input, calculating some formulas and finally sending data back to your browser or to the SQL database.

Analogue, back to 60th, CPU is - the engine in your electrical "typewriting machine", and if it runs slow, even when you typeveryfast it willnotprocess the data, but will either queue them and type after you finished pressing buttons (good typewrites) or simply jam the letters :) (lousy typo). Well, of course Acumatica is a good one, it never jams! :)

Back to the test, here is the daily transactional load for the past two years.


I can see clear peeks at some days up to 50,000 transaction lines per day. While the other days it can be less that 100. So our CPU must be able to withstand these peaks. 50,000 per day could be over 8 hours equally or just in 1 minute :). SO these aggregated data are nice looking but can't determine what CPU actually does and how powerful it should be.

Lets take a closer look at transactions per minute, to see actual peaks.


Data became more realistic, at the day highlighted in red we had some peaks when users entered 6000 to 8000 transaction lines per minute. Lets take a closer look at that specific day.


And now lets put the first peak under the microscope.

Here we can see that Acumatica processes data with 5,000 records per minute rate, placing 5000+5000+4000+1000 into the queue, within 3 minutes. So the actual processing rate would be something around 15,000 transaction lines per 3 minutes, or about 5,000 transaction lines per minute, when data supplied in Large chunks.

At the same time, we can see that at 9:48PM system processed 8,000 records at peak. At that time amount of data was smaller or, may be CPU was less loaded with other non transactional tasks.

Anyway, for us it is a very good indication, Acumatica can process 5,000 to 8,000 transaction lines (rows) per minute. For 2 CPUs it will be 2,500 to 4,000 transaction lines per CPU per minute. Here we can break it down to per second and will get gold:

One CPU can process 40 to 65 transaction lines per second at max.

Of course I assume this is a dedicated CPU core.
It can also be Virtual, but Server will EAT IT UP FULL om-nom at such peak loads. So it will become Virtual ate Real. :)

One of the examples could be Distribution based company processing large volume of Sales every day. So what it means to this company: if sales order is around 20 lines each, then:

Single CPU can process 2 - 3 Sales order per second. Max. 

Lets now think about users prospective, how many users can work in the system.
Answer is - This really - DOES NOT MATTER :) The only thing that matters is how many transactions these users do.

But, anyway, going to my example, here is the number of NAMED USERS worked with Acumatica during company life. We do not license by those, but I was just interested how many users were creating such a traffic jam :)


Well we can see that at peaks there where 40-45 physical persons in the office :) using Acumatica. Very good. We can clearly see the weekends :). Notice Implementation stage :). And then Go-live and after go-live. As well as steady operations part later. Nice... Looks like a comb...

Another metric we can use. Number or Operations. Which is, log in, open screen or report. I am not talking about operations within the screen which can be treated as transaction, but, well, errr, mmmm. :)
Operations like JUST OPEN SCREEN OR REPORT OR HELP etc.


What I see here - is how difficult was 2012 Year Closing process :) And when team went on holiday after it ;) Look at it in details, see how difficult it was. Below are Operations Per Day.


Some days were 6,000 screen openings and logins PER DAY. By just 30 people. 200 screens were opened by a SINGLE person per day in average. Think about it...

Conclusion is:

Number of Users DOES NOT MATTER AT ALL, the only thing that is important NUMBER OF TRANSACTIONS at its PEAK.              PER SECOND.

Single CPU can process 40 to 65 TRANSACTION LINES per second.

Single CPU can process 2-3 Sales Order 20 lines each per second. 

For distribution based business, translated to Editions it will be:
Departmental = 4-6 SO per second,
Divisional 8-12 SO per second,
Enterprise 16-24 SO per second.

For other industries just take peak load, calculate number of transaction lines per second, compare with what mentioned above.

Well, all this in assumption that you will not design other CPU hungry logic on reports or BI.
With more data available for analysis from our customers I will be able to estimate the impact of it as well.

Cheers,

Sergey.

Acumatica 4.1 General Availability Release. Get it NOW !

$
0
0
Hi Everyone,

We just published download links on our portal for Acumatica 4.1
Please try this amazing release.


Cool features available now:

1. Multiple files upload, drag and drop.
2. Filters on the grids per column.
3. And YES, Customer Portal !
4. Inquiries are now exporting DYNAMIC Excel. So, forget about reports :) Create Excel, pivot etc.

Try it, it is awesome.

All the best,

Sergey.

P.S. Somehow I realised I spend most of my time sitting at the login page and clicking refresh....so nice....

Application Pool Settings. Make Sure its 64 bit.

$
0
0
Hi Guys,

Just wanted to share application pool settings, that we should set in order to allocate memory better by WEB server.

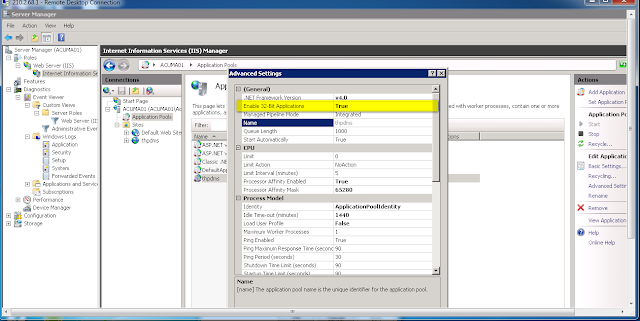
Assuming we use 64 bit machine to host our IIS server, we may still choose 32 bit or 64 bit compatibility for Application Pool.

32 bit mode allows us to debug the process, therefore we could forget to switch it back to 64 bit mode after debug process it complete and we go for production.

How can we identify that Web Site is using 32 bit mode? Just look at the task manager:


As long as you see x32 at the end of the IIS Worker process name - it runs in 32 bit mode.

Form IIS you can find this option under Application Pool settings


What may happen on production environment when it runs on 32 bit mode, system may consume all memory, and due to 32 bit mode it will not be able to scale it above 2G/4G. And what will happen next:


In order to prevent it from happening, we should switch Application Pool BACK to 64 bit mode:


All the best,

Sergey.
Translating Acumatica. Changing Field Labels. Regional Settings.

$
0
0
Hi Everyone,

A task to translate the user interface is quite common in Asia, with it's multiple business cultures and languages spoken.

It can easily be done via translation tool inside Acumatica Cloud ERP. No Customization is necessary.
We can use the same approach when just a slight amendment of field names or grid labels is needed.

So first what we have to do - is to define a language.

Open System->Management->System Locales. Add new system Locale, well it can be a brand new language or the same English language, may be different region, for which we like to change the terminology. In my example English Singapore was created.


Once I made it active, system will include additional language into a login screen.


Then we can change default Date / Time format etc., basically all Cultural changes that we have in our computer we can impose on Acumatica. So when people from country A use it the have say DAY-MONTH-YEAR format but at the same time, user in country B will have YEAR-MONTH-DAY for example.


Now it is time to do the Translation. Please navigate to System->Management->Translation Dictionaries and choose language that we want to modify.


System displays all the labels at the grid below. For each label it lists all the places where it was used , take a look at the lowest portion of the screen. What we can do with it is to try the filter to narrow the list down to only specific labels or use the quick search field and then enter target value, which is translated field into the right column of the grid.


So lets try to translate the field Batch Number that is used at the General Ledger Journal Transactions screen. I would like to change it to "Document Sequence".


Entered Batch Number into a search bar, then highlighted the row with the Batch Number label, then added value to Target to be Document Sequence. Then Saved.
Line disappears right after save. Its because we have not selected Show Localized check box on top.


In order for changes to get effective, we have to re-login to the system and choose different language on login page. Right after it, modification is in effect.


If needed to translate all labels in one shot, it is possible by exporting labels into Excel file, then using professional translator (or just Google :) ) to change the labels, then uploading file back to the system.
Lets export labels fist.


Then save file locally then translate all the content to say Chinese simplified.


And now, we are just uploading this file back to Acumatica.


Save it and we are done. Re-login.


All the best,

Sergey.

Linking Sales Order to Purchase. Stock Allocation.

$
0
0
Hi Everyone,

One of the questions from our partners was - why don't we have a topic at Acumatica University on how to tie Sales Order to Purchase Order, then break this link, then see the goods allocation in the inventory.

Basic business process behind is when we sell something we may wish to buy goods for this specific sales order. And then, at some point we may reconsider and dedicate goods for another Sales.

I am using Demo database to demonstrate it. What I did first is switched off sub items, not to mess up the picture.


Step One. Create an Item in Stock Items screen.

Nothing special. Using version 4.1


After Item created I made a receipt in Inventory for 1000 pieces.


Step Two. Make a Sales Order.

Here I used the above item indicating a line should be Ship Complete. Added some quantity and price. Take note of Mark for PO check box. Will use it in the next step.


Step Three. Link SO to PO.

To achieve it, will mark check box Mark for PO. Then Press PO Link button.
We may already have a PO, so we can link to existing one.


We should select the line on that screen then Save to mark that existing PO to the SO.
But I wanted to create Another PO. We go to Actions->Create a PO. Then screen below comes out. Here we need to indicate the Vendor and Location and then click Process to create a PO. Once created, SO will get link to that PO automatically.


Here is the SO. Take note of the link.


Step Four. Break the link. Allocate to Another PO.

Let say we have reconsidered and wanted to reallocate the sales order to another vendor PO.
This is achieved at the Sales order. Unchecked Mark for PO on the line, save. It will automatically remove PO link. Now lets link to another vendor PO. Check Mark for PO again. Save.
Then call PO Link button. Now we can choose another vendor and PO.


Step Five. Verify Figures.

We can use either Inventory Summary to see current inventory positions


Or Allocation Details


Step Six. Receive PO and see what Happened.

Here is the receipt


And Sales Order can be now shipped. I created shipper document then confirmed it. Standard process.

All the Best,

Sergey.

Changing Login Picture.

$
0
0
Hi Guys,

Mike inspired me today with a good idea for a blog.
At the last day of summer, I would like to re-brand Acumatica Cloud ERP login picture.
From what it looks now:


You already know that with version 4.1 login frame auto refreshes every time.
We have pool of seven predefined pictures. They are kept here:


At present, the only option is to replace these images with what we want:


And here is the result:


The only problem is, every time we upgrade Acumatica, system will overwrite these pictures, so for the time being, have to copy them over from backup location. In the future we will make them stay.

All the best,

Sergey.

Snapshots. Easy Backup. Rapid Deployment.

$
0
0
Hi Everyone,

Time to discuss a nice option for cloud backup and rapid deployment. All of us dream about templates for implementation. It will make ERP closer to a box product. When you can buy software, apply a template, and that is it. One step towards it - Snapshots.

Think about snapshots like backups, that we can do for the whole system. And because our customizations and reports are stored in the database, we can include them into a snapshot as well.

For the template we have made few types of the snapshots to help partners implement the system quickly, by copying template installation to multiple clients. You can do your own!

Another important thing - snapshots can be saved as zip files, from the cloud server into your PC, like downloads. Alternatively they can be stored inside the database, as a blob files.

Lets create one.
Open System->Management->Companies. On the first tab you will see existing snapshots sitting in the database.


In order to create the snapshot - just press a button on top, Create Snapshot, a dialog will appear to give it a Name and choose the snapshot type.
Here we have to decide, we need it as a backup, with full data in it, or as a template for another customer site installation or like after we finished Proof of Concept stage, its good to copy to production all the setups and master files.

Take a note, transactions can be skipped!
Meaning no need to clean up the POC to turn it into production site !


Then there will be 2 options, Include Customizations and Prepare Data for Export.
Fist one is obvious, second one will make a zip file and store it inside the system. So you can download it later.

So here is the thing, you can just keep your snapshot within the database or you can download it and store on your PC/Store etc.

If zip file is ready to download, snapshot will show Prepared check box checked. Other wise you can still press button Prepare Snapshot.

Now if I click Export Snapshot, the file will be downloaded to my PC.
I can Upload file to the server by pressing Import Snapshot.

Then FINAL stage is restore the snapshot. You can do it by pressing Restore Snapshot button and it will place data from snapshot file into database tables.

Here is a small video related to snapshot creation, download, upload and restoration.


All the best,

Sergey.

Acumatica Asia Grows Rapidly

$
0
0
Hi Everyone,

First of all, thak you for attending numerous trainings we did in Asia this quarter. I had collected plenty of topics for future postings. And of course I appologise for not posting for a month. :)

It was really busy quarter, we have signed more than 20+ partners, and closed 14 deals in Asia pacific. With more and more partners joining Acumatica fan club, we are also planning to grow with you !

As a company we are to settle regional partner ecosystem, with training centre and appointed traininers all over the region. Acumatica University courses are now under review and soon will be available as a classes.
In parallel I am eager to have more people in our Acumatica team. If you feel your skills are fit, feel free, join! Send me a CV or just let me know over the e-mail or skype!

Our PR is to grow as well, soon there will be events in Vietnam, Singapore, Philippines and more.

21 October we plan to have a training session for partners in Singapore for deep dive development. Those who are interested, let me know! Please note, passing course T101 is a must.

All the best,

Will keep you all updated,

Sergey.

Setting the Tax Right. Singapore.

$
0
0
Hi Everyone,

Here is a quick setup guide for Singapore GST Tax. Its all driven by IRAS requirements for tax codes and their behavior. Here is what tax report should include.

Here are what codes are recommended. From a guide for accounting software developers.


You can easily find these documents on IRAS web site.

In Acumatica ERP we are going to setup TAX module based on IRAS guidelines. Final Tax report should look based on above requirements.

1. Set up a tax Agency. 
This is done in Accounts Payable module, just create a vendor for Comptroller of Goods and Services Tax in your system. Mark it as a Tax Agency, provide Period for report- in our case its Quarter. Then specify accounts for GST Input and Output Tax.


One important option here - I have chosen to report based on period in which documents are posted, not based on original invoice/bills dates.

2. Setup Tax Boxes for GST Report.
Remember the IRAS report format - we just need to setup in the system reporting settings and groups.
First we setup reporting boxes or lines:


Then we setup Groups:


Then for each group we have to specify the lines that we add, one by one.


Last two groups we made empty, due to non reporting nature of them.

3. Now lets setup Tax Codes.

Here is one example of the tax code, the rest are using the same logic, except inclusive ones.


For Inclusive tax, it uses different option Calculate On:


4. Setup Tax Categories and Tax Zones.

Recommended settings below. Tax categories then can be added to inventory or non stock items, while tax zones to vendors and customers.


And categories:


And the combination of Zones with Categories will end up with right Tax Codes.

All the best,

Sergey.

Solving the Problem with Data Retention.

$
0
0
Hi Guys,

In brief, I need your advise.
Got a problem with one of the prospect, willing to migrate from NetSuite to Acumatica.

They are now stacked to NS due to a legal requirements for data retention. Can you imagine!!!
You see, due to limited deployment models with Net Suite, they can not install the system on premise for historical usage, because they do not owe the license. So now they can not change the ERP from NS to anything else because if they unsubscribe from them - they will loose the whole system with all the customizations.

Even though the database can be extracted in some weird format, still they loose access to reports.
And for the audit they may need all the reports immediately based on auditor request.

Like, I know, what they would do if they decided to change ERP from Acumatica to something else, we allow to use unregistered license for two concurrent users, even if you unsubscribe from cloud or Subscription on Premise license. But NS do not allow that!

What to DO!!!! How to help them?

All the best,

Sergey.

Example of using Acumatica on the Go. 3G + Tethering + Outstanding AP Bill.

$
0
0
Hi Guys,

Here is what you can do while waiting in the queue :)


All the best,

Sergey.

We have got official Vietnamese Translation.

$
0
0
Hi Everyone,

Finally we have got Vietnamese translation file for Acumatica.
It was done by professional agency, same what was engaged for Microsoft Dynamics and SAP translations in Vietnam.

Here is the result:


All need to be done - take the file and upload it to Translation dictionaries.

You enjoy,

Sergey.

Timeouts. Keeping Site Alive or Safe ?

$
0
0
Hi Everyone,

In this post I would like to touch options that affect session timeouts.
IIS together with our Application has multiple settings to control it.

First of all, there is a universal setting in our web.config file, that controls the appearance of the Reminder Bell on the tool bar. Once it is active, system will auto check notifications and reminders from the application regularly. Here is the icon, that will appear:


Settings controlled by web.config entries


ReminderVisible makes bell appear on the screen.
ReminderRequestPeriod controls how often web page will ping the server on active reminders status.
And ReminderActiveMode will either switch auto ping on or off. By default it is off.

Well, web.config file you can find at the root folder of your Acumatica ERP web site.

With Reminder activated there is no need to control other settings on IIS as auto heart beat will keep session always open, your browser will never disconnect from the server.

There is one problem though.

You may wish the browser to auto close session if say you go to gave lunch or just forgot to log out from Acumatica. In this case, Reminder will not be a good option.

Second option is to keep Reminder off, and configure IIS instead.
There are few options to tune.

1. Web site itself controls the connection timeout. If you open IIS->WebSite->Advanced Settings->Connection Limits there is a setting Connection Timeout (seconds).


As per documentation it:

Specifies the time (in seconds) that IIS waits before it disconnects a connection that is considered inactive. Connections can be considered inactive for the following reasons:
  • The HTTP.sys Timer_ConnectionIdle timer expired. The connection expired and remains idle.
  • The HTTP.sys Timer_EntityBody timer expired. The connection expired before the request entity body arrived. When it is clear that a request has an entity body, the HTTP API turns on the Timer_EntityBody timer. Initially, the limit of this timer is set to the connectionTimeout value. Each time another data indication is received on this request, the HTTP API resets the timer to give the connection more minutes as specified in the connectionTimeout attribute.
  • The HTTP.sys Timer_AppPool timer expired. The connection expired because a request waited too long in an application pool queue for a server application to dequeue and process it. This time-out duration is connectionTimeout. 
In practical aspect for us it means, if for example, you created a report or inquiry that uses view in the database, and the first record that will come out of this view will come with delay longer than the above settings - session will get disconnected.

So this settings is crucial, especially if you plan to write your own heavy reports or BI tools.

Recommended setting here purely depends on the longest time you expect SQL server to return you the result set.

2. Login Timeout. We control from web config how long system will wait for you to login on the login screen
 <formsAuth loginUrl="Frames/Login.aspx" timeout="60" />

3. Run time execution timeout
 <httpRuntime executionTimeout="300" requestValidationMode="2.0" maxRequestLength="1048576" />

As per documentation
The ExecutionTimeout property indicates the maximum number of seconds a request is allowed to execute before being automatically shut down by ASP.NET.

4. Session State timeout, which you can increment.
<sessionState cookieless="UseCookies" mode="Custom" customProvider="PXSessionStateStore" timeout="60">
        <providers>
          <remove name="PXSessionStateStore" />
          <add name="PXSessionStateStore" type="PX.Data.PXSessionStateStore, PX.Data" ignoreUrl="~/Frames/Menu.aspx,~/Frames/GetFile.ashx" />
        </providers>
      </sessionState>

5. Application pool idle timeout that can affect your session data if left for too long


This one can be set to 1440 which is 24 hours.

Please make sure you restarted IIS if any of these parameters changed.

All the best,

Sergey.

Personalised Dashboards at your Home Page.

$
0
0
Hi Everyone,

Here is how to create personalised dashboard home page for each member of your organisation.
First, as administrator I will create 3 additional menus and add dashboards to each menu.


Two


Three


In order to achieve it, I have to create Site Map for these dashboards here


Then I added menu items to it


Then I just added dashboards to these elements.


And the last step would be to make respective screens available to only certain users and make it Home page for them.


All the best,

Sergey.

Customer Portal on top of Acumatica ERP

$
0
0
Hi Everyone,

In Acumatica version 4.1 we have added portal functionality. Now is possible to give access for our customers or vendors, so they can see their orders or other information from the ERP with the access limited to their role.

Here is the video made by Doug Johnson, I found very useful, for the portal setup:


Basically to set it up you need to have Running Acumatica ERP instance.
Then you can add portal functionality to it.
If you have Acumatica with versions earlier than 4.1, you can first upgrade it to 4.1 using the same Wizard, then add portal.

In order to fill it with relevant inquiries, please create or reuse existing queries.
You can refer to some of my previous articles on how to create Inquiries.
For example this one:
Active Users

Then this inquiry can be added to the Portal Site map.

Please try and advise if any issues configuring the Portal.

All the best,

Sergey.

Customizing Numbering in Acumatica

$
0
0
Hi Guys,

Acumatica has flexible numbering sequences that allow us to create prefixes, separate numbering sets and basically serves well when there is a uniformity for the numbering for a given screen.

For example, when we issue specific number for specific month or year we can always create separate numbering sets with starting date from effective date for that month or year and problem will be solved.
Here is the example of numbering set for AR payment screen, where each month system will generate numbers for Payment Reference ID starting from predefined prefix and month code:


When we look at AR Setup screen, this numbering sequence ID is specified at Payment Numbering Sequence:

But this example is too simple. What if we need to use special numbering under specific condition. For example, when you do synchronization with external system, Oracle for example, it may be that you are getting Payment ID numbers from there, and need to override the Auto numbering sequence that is in force at your setup. Another words, from Oracle you can get number starting from IV instead of RV and the number itself should be from Oracle, not generated by Acumatica.

To solve it, we can add Numbering Sequence as a custom field to our setup screen. Just add a field to AR Setup, and make it same as other payment numbering sequence fields:

 Here is the customization code behind it:
<DAC type="PX.Objects.AR.ARSetup">
<Field FieldName="UsrARImportID" TypeName="string" MapDbTable="ARSetup" TextAttributes="#CDATA">
<CDATA name="TextAttributes"><![CDATA[[PXDBString(10, IsKey=false, BqlTable=typeof(PX.Objects.AR.ARSetup), IsFixed=false, IsUnicode=true)]
[PXDefault("ARIMPORT")]
[PXSelector(typeof(Numbering.numberingID))]
[PXUIField(DisplayName="Import Numbering Sequence")]]]></CDATA>
</Field>
</DAC>

And then we should create a new Numbering Sequence called ARIMPORT. Here is the hint, if we need number to come automatically from Acumatica, then we should feel it with something, but if number is provided from outside, say MANUALLY, then we can just create the ID ARIMPORT, leaving content blank:
Now next step, somehow we need to identify that the Data Import is going on. We have a special function to do it. So now I will go to the AR screen, then add data event Row Persisting, to the Document Level. Basically the number for the AR Invoice or payment is issued on save :)

Please take note of this.IsImport it changes to True when we do data import from Oracle.
Next we should tell the screen if this is Data Import process, not to use standard numbering sequence but to look at newly defined ARImport one:

So here we only do at Inserting the row, then we create numbering variable and pass whatever we keep in AR Setup, in our case it will be ARIMPORT value. Then we select from table Numbering the content for the ARIMPORT row. If we do have it there, we set autonumber variable to False.

So now we can decide what do we do, we manually populate the number from our Import file or call autonumbering process from ARIMPORT predefined sequence.

I do here manual population from the field UsrOrigRefNbr from the Import file.
But you can use commented code to call AutoNumberAttribute process to generate the number based on ARIMPORT Numbering Sequence content.

All the best,

Sergey.
Viewing all 110 articles
Browse latest View live


<script src="https://jsc.adskeeper.com/r/s/rssing.com.1596347.js" async> </script>